A Purchase Order is created to document a purchase of Inventory Products from a Vendor. This is a crucial step in making sure that your inventory counts are up-to-date, so that all of the other processes down the line from seed to sale work like clockwork. Inventory Products from a vendor can not be sold until they have been brought in through a Purchase Order. In this article, you will learn how to create a Purchase Order.
To add a Purchase Order, follow the steps below:
- Step 1 - While in the Purchasing module select Purchase Orders Current in the navigation bar and click the New button.
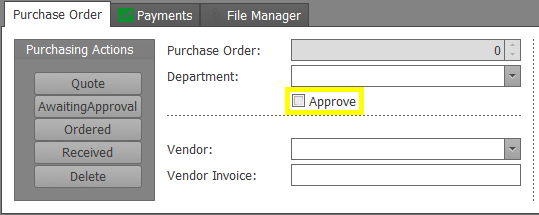
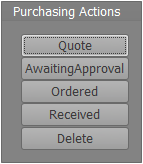 Step 2 - In the Purchase Order detail window, select from the Purchasing Actions. If an employee is making a purchase order, they can mark it as "Quote" while working and "AwaitingApproval" when completed. An administrator must then mark the Approve checkbox and mark the action as "Ordered". Later, when you receive the Inventory Products, you will adjust the Purchase Status to "Received".
 Step 2 - In the Purchase Order detail window, select from the Purchasing Actions. If an employee is making a purchase order, they can mark it as "Quote" while working and "AwaitingApproval" when completed. An administrator must then mark the Approve checkbox and mark the action as "Ordered". Later, when you receive the Inventory Products, you will adjust the Purchase Status to "Received".
 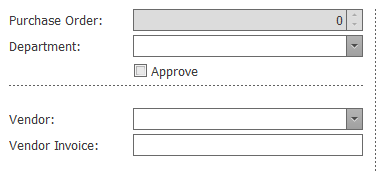 Step 3 - Continue to complete each field in the Purchase Order detail window.
- Purchase Order - This field will auto-populate with a unique identifying number upon adding your first Inventory Product to the Purchase Order. This cannot be edited.
- Department - Select a department to associate with this purchase order or add a new department.
- Vendor - Choose an existing vendor from the drop down menu or add a new vendor.
- Vendor Invoice - Type the vendor's invoice number associated with this purchase, if applicable.
- Approve - This is where the administrator marks "Approved" for a Purchase Order ". If the administrator is making the Purchase Order, they must check this to be able to set the status to "Ordered".
- Step 4 - Now it's time to start adding Inventory Products to the Purchase Order. To begin, click on the Plus button within the Products section. A new Product pop-up will appear.

 Step 3 - Continue to complete each field in the Purchase Order detail window.

- Step 5 - In the Product pop-up window, use the drop-down menu to search and select the desired Inventory Product in the Inventory Product field. If the Inventory Product will need to be converted to a new unit of measure, select or add a new unit conversion in the UOM Conversion field. Adjust the quantity of the Inventory Product you'll be purchasing in the Order Qty field. Once the Purchase Order has been marked received (Receiving a Purchase Order), the Received amounts will be adjustable.


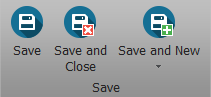
- Step 6 - Click the Save and Close or Save and New button to add more products on the pop-up window. Repeat steps 4-5 for all remaining Inventory Products in this Purchase Order.

- Step 7 - For any Inventory Product associated with a specific strain, make sure to enter that strain information.


- Step 8 - Check your Purchase Order totals.
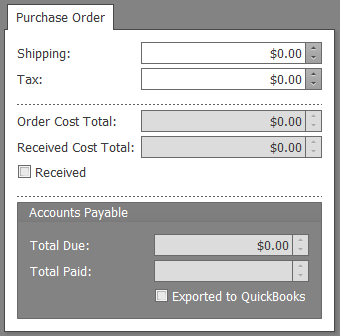
- Shipping - Enter the total shipping cost applied to this Purchase Order before it is marked received.
- Tax - Enter the total amount of tax applied to this Purchase Order before it is marked received.
- Order Cost Total - This field will auto-populate when items are ordered. This amount is based on the Order Unit Cost and the amount entered into the Order Qty fields.
- Received Cost Total - This field will auto-populate when items are received. This amount is based on the Received Unit Cost and Received Qty fields.
- Received - The Received checkbox will auto-check when the PO has been marked Received in the actions and Saved.
- Order Cost Total - Once you add Inventory Products to the Purchase Order, this field will automatically update to reflect the cost of all of the Inventory Products ordered, plus shipping and tax.
- Received Cost Total - Once the Purchase Order is Received, this field will automatically update to reflect the cost of all the Inventory Products actually received, plus shipping and tax. If there are more or less received than ordered or if the Received Unit Cost is different from the Order Unit Cost, the Received Cost Total will not match the Order Cost Total.
- Total Due - This fields will auto-populate to reflect the Order or Received Cost Total depending on the Purchase Order status.
- Total Paid - This field will auto-populate to reflect any payments applied to the Purchase Order.
- Exported to QuickBooks - If using QuickBooks, the Total Paid checkbox can be used to denote whether the Purchase Order has been Exported.

- Step 9 - Choose one of the Save options.
You've done it! You've created a new Purchase Order!