
Grow Batches allow you to track and manage your plants as a group (instead of individually), which helps you to operate more efficiently. Each Grow Batch has a unique Batch ID, so you can quickly locate and manage the batch you need.
Add a Grow Batch
To add a Grow Batch, follow the steps below:
- Step 1 - In the Grow and Harvest module select Grow Batch from the navigation pane and then click the New button. This will open a new tab to build your Grow Batch.
- Step 2 - Fill out each of the following fields to create the Grow Batch.
- Batch - This 3-segment number is the unique identifier for the Grow Batch. This field will auto-populate, once you have entered all of the other fields. Each of the 3 segments in the Batch ID carries meaning to help you know more about the Plants in that batch at a glance.
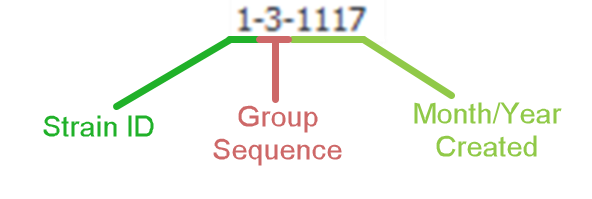
- Strain ID - The first segment of the Batch ID tells you to which strain the Plants in this Grow Batch belong. Since each Strain in KLĒR has a unique Strain ID, this number is automatically used as the first segment of the Batch ID when you create a new Grow Batch. This list can be found in the Admin Tools module under Grow Settings and Strain List.
- Batch Sequence - The second segment of the Batch ID tells you the sequential order of the creation of this Grow Batch during a given month and year. In the example above, this was the third Grow Batch created during the month of November, 2017. This ensures that each Grow Batch will have a unique Grow Batch number, despite having the same Strain ID and month/year of creation.
- Month/Year Created - The final segment of the Batch ID tells you the month and year the batch was initially created. In the example above, the Grow Batch was created in November (11) of 2017 (17).
- Origin - Choose whether these new Plants came from seeds or cuttings from the Mother.
- Mother Plant - The batch of the originating "parent Plant" from which the new Plants you're adding have been derived through cloning.
- Strain - The unique name for the Plant variety associated with these Plants. You can choose from a list of all of your available Strains. This will auto-populate if you choose the Mother Plant first.
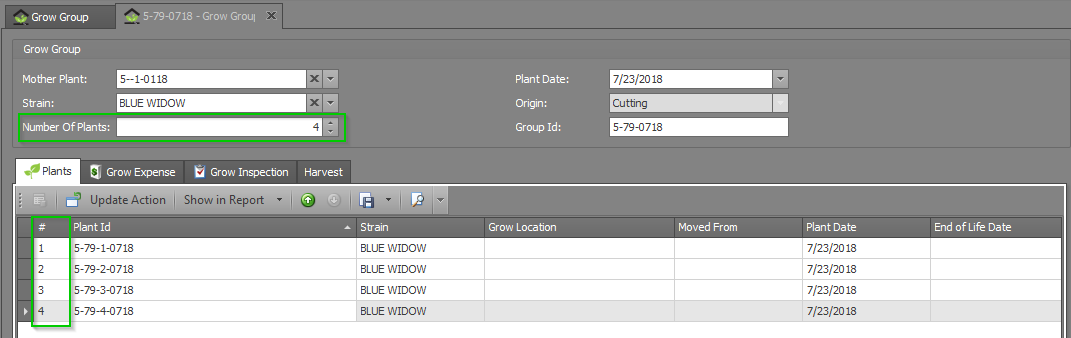
- Number of Plants - The total number of Plants that are currently a part of this Grow Batch. When you are first creating a Grow Batch, this will be automatically set to "0".
- Leave this field alone for now - before you can add Plants to your Grow Batch, you must first save the new Grow Batch to create the Batch.
- Plant Date - The date these Plants were planted or cloned
- Batch - This 3-segment number is the unique identifier for the Grow Batch. This field will auto-populate, once you have entered all of the other fields. Each of the 3 segments in the Batch ID carries meaning to help you know more about the Plants in that batch at a glance.


- Step 4 -Choose one of the Save options.


Now you'll be able to add Plants to the batch!
Add Plants to a Grow Batch
- Step 1 - While viewing the Grow Batch detail page, you can add Plants to your Grow Batch by adjusting the value in the Number of Plants field to your desired number. This will automatically create the number of Plants you need in the Plants section. (Note: You can always add Plants by increasing the number, but you can't decrease the number of plants without moving them to another batch or deleting them.)

If your plants did not create, click the Save button at the top of the screen first and try again.
- Step 2 - Check to make sure your Plants have been created by clicking on the Plants tab within the Grow Batch detail window. You should see a list that has the same number of unique Plants as shown in your Number of Plants field. Notice that each new Plant has a unique Plant Id, yet shares the same Strain, Mother and Date as the rest of its fellow Grow Batch members.
If too many Plants are entered into Number of Plants, decreasing the number will not delete the Plant ID. To delete a single Plant, double-click on that Plant to view its pop-up window. Then click the delete button in the the top ribbon.
Success! You've created a new Grow Batch with its own little set of Plants and unique Batch ID that you can now track the process from seed to sale.
